
1,000th Day of School T-Shirt
How to upload a 1,000th Day of School SVG into Cricut Design Space and use it to make a t-shirt
Equipment
- Cutting Machine such as the Cricut Explore Air 2 or Cricut Maker
- Design Space Software
- Green Cricut Mat (12"x12" is fine, but a 12"x24" mat will be faster if you are cutting out more than one copy)
- Cricut Everyday Iron-On vinyl in Gold, or Siser Easyweed HTV in Vegas Gold
- Cricut Weeding Tool
- Ruler (I highly recommend the Cricut ruler)
- Cotton t-shirt (I used Gildan t-shirt in black)
- Cricut Easy Press or regular iron
- Cricut Easy Press Mat
- Parchment paper if you are using a regular iron
Instructions
- Prewash the t-shirt following the manufacturer's care label. DO NOT USE FABRIC SOFTENER as this could cause a problem with the iron-on adhering to it. Dry it completely.
- Upload the 1,000th Day SVG file onto your computer.
- In the Cricut Design Space software, upload the SVG from your computer into Design Space, and then insert it onto a blank canvas.
- This SVG is sized for a standard adult size large crew neck t-shirt. You can adjust the dimensions along the top tool bar to make it larger or smaller if you want.
- Click "Make It" and follow the on-screen directions. Make sure to mirror the image by clicking the toggle under the small image of the mat on the left side of the screen.
- Put the iron-on vinyl face down (the shinier, more colorful side down) on a green Cricut mat. One design will need a piece of vinyl approimately 9 inches long. If you are making more than one copy, you can use the larger 12"x24" green mat. Smooth out the vinyl so there are no bubbles.
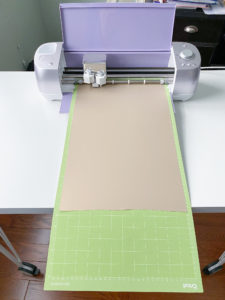
- Follow the on screen directions to load your mat into your Cricut machine and begin the cutting process.
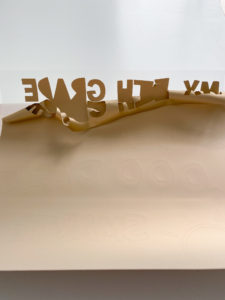
- When it is done cutting, unload the mat. Turn the entire mat face down, and then bend a corner of the mat upwards to release the vinyl. Hold the vinyl against the table with one hand while peeling the rest of the mat upwards off of the vinyl.
- Put the vinyl on a flat surface, face down, so the design looks backwards to you. Use the Cricut weeding tool to weed away any parts of the vinly that are not part of the design. Don't forget to remove the center of letters such as O, A, R, and D.
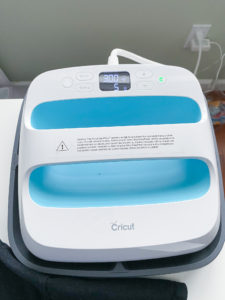
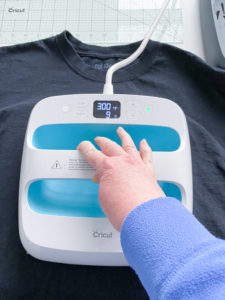
- If you are using a Cricut Easy Press, refer to https://www.cricut.com/heatguide to find the temperature setting for the fabric and iron-on materials you are using. If you are using an iron, make sure there is no water in it, and preheat it to the cotton/linen setting.
- Preheat the t-shirt for about 5 seconds. This will help remove any leftover dampness.
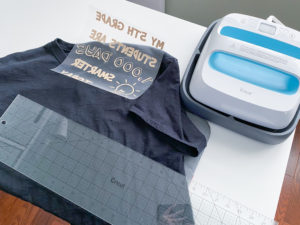
- Use a ruler to place your design onto the shirt. The top of the design should be 3 inches below the bottom edge of the seam of the collar's lowest point. If you have a Cricut ruler, you can use the guides on it to make sure your design is straight from left to right. The right edge of the "H" in the word "5TH" is the center of the design. Once you have it in position, carefully remove the ruler. Smooth down the image with your hands.

- Put the Cricut Easy Press Mat underneath the shirt. Follow the Easy Press Heat Guide directions for how long you need to hold the press on the design. I used a 100% cotton t-shirt so I used 300 degrees for 30 seconds. (If you are using a regular iron, follow the directions from the manufacturer of the vinyl you are using about how long to hold the iron on the design. Make sure to use a sheet of parchment paper between your iron and the design. It works best if you put the shirt on a hard surface, such as a wood cutting board, instead of on a cushioned ironing board.) Flip the shirt over and press again on the back for 15 seconds.
- If the vinyl you are using is "cold peel" (such as the Cricut Everyday Iron-On) wait a minute for the vinyl to cool down. Then begin carefully peeling the clear backing away from the fabric. Pull on a diagonal. If you notice that any pieces are not sticking to the fabric, carefully place the clear sheet back down, then re-iron the design on the front and back.
- When it is time to wash the shirt, only wash it in cold water, and tumble dry on low, regardless of what the shirt's care tag says.