Chances are, over these past few months you have been invited to participate in a drive-by birthday parade, bridal shower, baby shower, or school parade. Being that indoor gatherings have been eliminated due to the social distancing guidelines, these parades are a great way to safely celebrate life’s milestones. In fact, some people say they are more memorable than a traditional party and are definitely more affordable for the organizers!
At the beginning, people were using markers, crayons, and paint to decorate their signs. But once it became apparent that these drive-by celebrations were going to become the norm, for the time being, it became pretty time-consuming to make these signs, especially if you have children who were invited to several drive-by parties in a month.
[My blog posts contain affiliate links. These don’t cost you anything, but they allow me to continue running this site and providing free content for my readers. Full disclosure here.]
Here’s where the Cricut cutting machine comes in really handy. If you have a Cricut, there’s a good chance you already have a variety of card stock on hand. So for the cost of some oaktag and glue, you can make festive, custom signs that can be a keepsake for the recipient.
If you have never used your Cricut machine yet, or have been intimidated by creating a project in Design Space, then making a sign is a great first project because it uses some of the more basic features of the program. I prefer to use Design Space on my desktop computer because it has more features than the mobile app version. However, for what you need to make a sign, the mobile app will work fine.
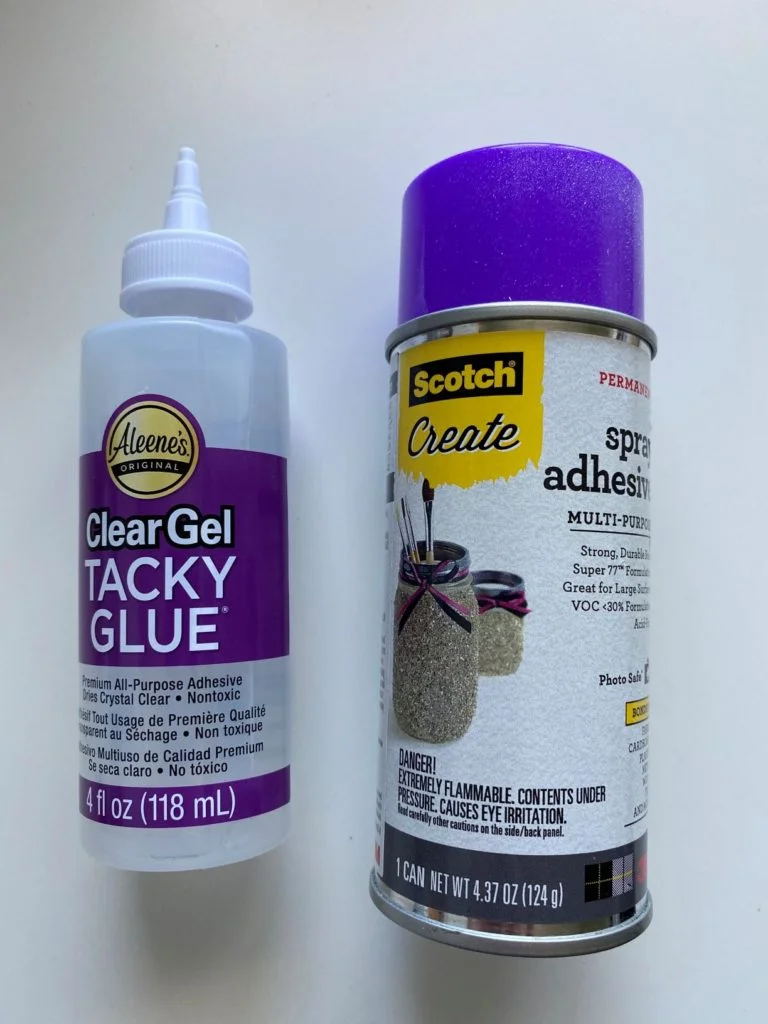
Supplies Needed
- Cardstock in the colors of your choice
- Oaktag or posterboard
- Glue or spray adhesive (I used Aleene’s ClearGel Tacky Glue)
- Cricut cutting machine
- Cricut light blue mat
- Inkjet or laser printer if you wish to print more complex images
- Computer or mobile device with Design Space software/app
Directions
In this video, I demonstrate step-by-step how to use Design Space to create your sign.
- Open Design Space. If you are making a sign on oaktag, it will be easier to design if you put an outline of the size on the canvas. To do this, click “Shapes” on the left side, then click “Square.” Then click the lock icon on the bottom left corner of the square to unlock the dimensions. At the top of the screen, type in the width and length of your oaktag or poster board. Mine is 28 inches wide and 22 inches long. To see your entire design, hover your mouse near the bottom left corner of the canvas until you see “- 100 +”. Hit the “-” until your entire rectangle fits on the screen.
2. To make it easier to see your design, change the color of your rectangle by clicking on the box next to “Linetype” at the top, and choose a lighter color.
3. On the left side, click “Text.” Then type your message. You can only use one font per text box, so you might need to add several text boxes if you are using different fonts or font sizes.
4. Use the arrows on the bottom right of the text box to stretch your message to the desired width.
5. To change the font, click the drop-down menu under “Font” at the top. Then click the “System” tab to use the free fonts already installed on your device. (If you choose a Cricut font, you will have to pay for it.) For this project, I used KBStick to the Plan, a free font available at dafont.com (https://www.dafont.com/kbsticktotheplan.font)
6. To change the color of the font, click the square next to “Linetype” at the top.
7. For images, what I usually do is Google “free svg” and the description of what I want. Then I download that image into a folder on my computer. Then, in Design Space, click on “Upload” on the left, and click the “Upload Image” button. Click the “Browse” button to find where you saved the image. If your image has several colors, choose “Complex,” then “Continue.” If you want to include that entire image, choose “Continue” again. Since I wanted to print this image on my regular printer in order to get all the shading of colors, I then chose “Save as a Print then Cut image.” Then click “Save.” Now you can click the image, and then “Insert Image” to put it into your design.
8. You can resize your image by clicking on the bottom right and dragging it. If you want to rotate your image, click on the curved arrow on the upper right corner and rotate it to the desired angle.
9. Don’t forget to save your work by clicking “Save As” on the top of the screen.
10. Click on “Make It.” If you get a message that the project is incompatible, look at the layers panel on the right, and see if any parts of your design have a yellow warning triangle with an exclamation point. Click on that to see what the problem is. Chances are, something is too large to fit on a Cricut mat. If your message is too large, click on it, then click “Ungroup” at the top of the layers panel on the right.
11. Since you are not printing the actual oaktag outline, you can hide it by clicking the eyeball icon next to your “square” in the layers panel on the right side of the screen.
12. Once you resolve these issues, you should be ready to cut your design. When you click “Make It,” scroll through the different mats and change the paper size if needed. Since I used all 8.5″ x 11″ cardstock, I changed everything to that size. Once you are happy with that, click back on the first mat again, then click “Continue.”
13. If you have any “Print then Cut” images, those will print first. After printing one, put it on a light blue Cricut mat (the least sticky of the mats and the one that is best for cardstock), load it into the Cricut machine, and follow the on-screen directions to cut it out.
14. To remove cardstock from the mat, DO NOT BEND OR PEEL THE CARDSTOCK UP. Instead, turn the mat face down, and bend the MAT up towards you. This will loosen the cardstock. Use a scraper (or gently use your hand) to ease the cardstock off the mat.
14. For the text, put the cardstock onto the light blue Cricut Mat, load it into the Cricut, and follow the onscreen directions.
15. Lay out your pieces onto the actual oaktag to get an idea of how you want to space everything out. Then put a little of the tacky glue on the back of one piece at a time and attach it to the oaktag. If you are using spray adhesive instead, USE TARPS, as the aerosol spray goes all over. I don’t recommend glue sticks, as the bond never seems that secure, especially if you are going to be hanging these signs on your car and exposing your sign to the wind.
16. I like to dry these flat overnight. If you are going to attach them to your car, use painter’s tape on the back.
While this may look like many steps, they are all pretty quick and straightforward. The benefit of making a sign using the Cricut instead of just hand drawing one is that you now will have the basic template saved in Design Space, so it will be quicker to make your next sign.
Happy crafting!